Tuesday, October 4, 2011

Sketchup-Vray Exterior Night Scene

For me, creating the night scene far more challenging than creating day scene. For day scene, all I have to do is create the modelling, then set the sunlight, set the vray parameter, et voila, the image is ready.

Whereas a night scene needs more effort. On one hand, I want to have a dark enough scene so I can show all of the additional lights, but on the other hand, it can't be too dark since we still want to see the buildings details. To solve this, I usually created the scene using Afternoon or dawn image background. So there's still enough light for the sky.

And we also have to design the lighting placement so those additional lighting will make our building looks more beautiful. But generally I use :
  1. Rectangle Vray Light with Invinsible=on, this will be the main source of light from inside of the building. The size usually big, from the ceiling towards the floor. Or you also can place it from the windows towards inside of the building. For this kind of light, you probably need to raise the subdivision about 15-25, depends on how big is your image output will be, so there won't be any noise.
  2. Rectangle Vray Light with invinsible=off. I will attach this kind of lamp right to the ceiling, or some lamps on my scene. I also use omni lights for round lamps. For this kind of lamps, I will raise the intensity value about 10-20 units higher than the invinsible lights around it. This so the light won't washed out by other lights.
  3. IES light, for uplight and downlight. You will need IES light file for this, you can find it from the internet either for free or buy it on the application stores. Personally I got mine from a friend, so, I wouldn't know exactly where to find them. But, for IES light, you need to try out some files to find the one that most suitable for your scene.
So in conclusion, if you don't have enough time, don't create a night scene ^_^

This image created without any Photoshop touch up


This is the Environment (Sunlight) setting for Vray Night Scene


Good Luck!


Saturday, October 1, 2011

Sketchup-Daytime Vray exterior Setting

For me, creating a modern minimalist buildings using sketchup is fun and very fast, and it also helps me to develop the concept that I have in my head. But there is one thing that I still don't like from sketchup is the trees. I still haven't found any tree model that is realistic enough for my scene. And when I found some that a little bit realistic, the tree file would be so big that it actually scares my computer :P

Therefore, I'd rather use photoshop to add tree elements to my presentation. But maybe you have found a good sketchup vray tree model? Please, let me know, it would be really helpful.

For this tutorial, the rendering result is still raw, without any photoshop touch up. And the street lamp is still horribly fake. But for your own scene you can find a better one.


In the video, I'm also going to explain a little bit about vray displacement to help me created a more realistic grass and water. You can also use this displacement for creating a rug, cushion, etc. But one thing you have to remember, if you use a lot of displacement, your rendering time will be a lot longer.

Here is the tutorial as you can see on YouTube

And these are the Vray parameter that I'm going to use :


Have a nice time learning!

Wednesday, September 14, 2011

Max-Vray Light and Camera Setting for Interior

I must admit, Vray is my most favorite rendering engine right now, both for 3dsMax and Sketchup. And for me, once you understand Vray parameter setting for 3dsMax, it's really easy to apply it to Sketchup's Vray. Also the other way around.

At the beginning, you might feel Vray is too complex since there's a lot of parameter that you need to adjust not to mention Vray has it's own texture that you need to master to gain maximum result. But it's really worth all the work. 

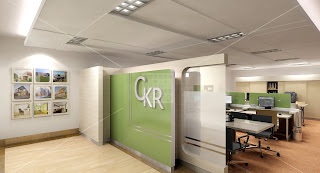
Interior Scene using Vray

Here's my youtube tutorial for this room's lighting and camera

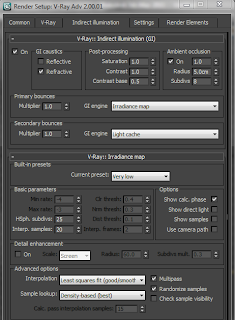
These are the setting Vray Interior scene with medium quality result, like the above picture (Click to enlarge it):


Monday, September 12, 2011

Max-Arch Animation 105-A Simple Car Animation

Cars can enhance our Architecture presentation, it also can help us explain our building's scale to our client. Therefore I feel that I need to add this Car animation to our Architectural animation series.

This car animation will be very simple, and the car movement will be just linear, since the car won't be the focus of our presentation. The controller would be dummies which linked with the car using Look at constraint, Position Constraint, Orientation Constraint and Path constraint.

There are something that you have to consider when animating the car :
  1. Pivot point direction. Since we're going to use link, the pivot point direction can be affected by the parent link.
  2. Hierarchy. Some controller have stronger impact than other controller. For example, If you use Look At constraint before using Link, the object won't be affected. Because Link will lock the controller that's used before.
  3. When using Orientation Constrain, pay attention to the Transform Rule, whether it's using Local or World. If it's using World, it would also lock some of the constraint controller that's used before.


Of course there are a lot more realistic ways to animate a car, using reactor for example, but that's for another time, another tutorial.

Good luck!

Thursday, August 25, 2011

Sketchup-Cool Section Animation

I'm using 3dsmax, long before I even learned sketchup. Initially I felt no need to master sketchup, because the presentation with 3dsmax (in my opinion) much more impressive, more people ask for it and has more widespread implementation. But there is one feature Sketchup that makes me so very interested to learn Sketchup. And that is the Section. A feature that's available in Sketchup Pro

Of course 3dsMax has Clip which function a bit similar to section. but section can be directly used for various things. It can be directly exported to AutoCAD for further editing, or can be presented with the feature layout (which is now also a step forward again), and the most impressive, in my opinion, is the Section can be directly animated.

When I first saw the section animation, I thought, surely this would be very difficult. But, now that I know the tricks, it's really easy! Unfortunately, when creating this tutorial, Section still can't be rendered using Vray. And I have not tried any other rendering engine. Otherwise, it would be really cool!!


Good luck!

Tuesday, August 23, 2011

Sketchup-Export to AutoCAD with layer


Usually, when we export Skechup files to Autocad, either 2d or 3d, the result will be in monochrome lines. So it would be rather difficult to separate those lines into different layers, for example walls, furniture, doors and so on. It can be done of course, but I would take a long time.

In this tutorial, I will show you an easier way. Basically, i just separate the layers in sketchup drawing, and then export those layer color to Autocad. And after that, i change each color to individual layers in CAD. Complicated? naah, you'll see.

I've also have explained how to make layer in  tutorial 3 follow me and layer


Good luck!

Wednesday, August 17, 2011

Max-Arch Animation 104-Creating Curtain using Cloth Modifier

I've explained about the Cloth modifier in my previous tutorial on creating a pillow (still in bahasa Indonesia though ^_^). And this time we will use it again in making curtains. The principle of making these curtains can also be used to make towels or flags (but for the flag should be combined with using reactor wind).

There are some things that are very influential to so your Curtain looked more natural :
  1. Cloth material you use. There are a lot of material in 3dsmax cloth curtain that exist, such as spandex, rubber, satin, silk etc.. I suggest you take the time to try out the material one by one and compare the parameters. That way, you will get a material that best matches your needs 

  2. Gravity. Sometimes we have to increase the value of gravity, this way will pull the blinds down so that the curtains don't look too stiff. 

  3. The amount of the segment. The smaller the segment, of course, the object will be more flexible. But do not make it too small segment, because it would burden the 3dsmax file. 
In this tutorial I'm using a plane, but you can also use the garment maker which I use in the Creating Pillow tutorial


Good luck!

Friday, August 12, 2011

Max-Arch Animation 103-Animating Doors and Windows

Following the previous tutorial, now I'm going to explain how to animate doors and windows in your building. Basically there are two types of doors and windows. The first one is default doors and window from 3ds Max and the second one is the one that you manually create. But in this tutorial you can also see that both types can be combined together.

Though its easier to animate the default doors and windows from 3dsmax, it will require more work when you want to add accessories such as doorknob, handle and such. So I don't think its suitable for close up pictures.


Good Luck!

Saturday, August 6, 2011

Sketchup-Animation Production using Camtasia

As we've learned in tutorial 11, Sketchup Vray render result are only in a series of images, either in JPEG or GIF, instead of a Video format. So we have to use other additional program to convert those images.

There are many programs that you can use, but in this tutorial, I'm going to use Camtasia 7. It will convert my GIF format into WMV (Windows media Video) format. But you can use other format such as MOV (Quick Time) or MP4.

When inserting images into the track, the smallest duration Camtasia allowed for images is 0.1 second. So, if you rendered your Vray images  using 15fps (frame per second) then you must edit the result again in camtasia and raise the clip speed value to 150% (but in this tutorial I use only 120% since it's smooth enough for me). Or if you use 30fps when rendering the animation, you probably have to raise clip speed up to 300%


Good luck!

Wednesday, August 3, 2011

Max-Arch Animation 102- Animating Camera and light

After learning how to animate the background in our previous tutorial, now we can learn how to animate a camera and also to control the light in our animation.
When our scene is in night scene, we are going to need some addition lights. We are going to use instance to copy our lights so later it would be easier for us to change the light value.  And the light direction is from the window to the inside part of our building so when we animate the interior of the building, the same light can be used and the scene will feel more natural.
As for the camera, though we can move the camera manually using autokey, in this tutorial we will attach the camera into a line, so that the movement of the camera can be set using a particular path. For that, we will use path constrain.


Good luck!!

Tuesday, August 2, 2011

Max-Arch Animation 101- Setting Vray Background

Animated presentations to the building and the interior is now already widely used. With the increasing advances in technology, computer capabilities in the rendering process (which was previously a major obstacle in rendering the animation) is getting better and better. Presenting design in animation will  also make it easier for us in explaining the concept of our building not to mention, more impressive.

The animation that I'm going to explain can also be used as background when we make a movie animation, or as a background of a game.

When creating background, I  sometime use  spheres or cylinders environments. But more often I use a sphere and a cylinder-shaped object. Sphere typically used when texture is used in the form of image of the sky or clouds. While the cylinders are used when the edges of the texture of the mountains or trees.

For Animation architecture, I suggest using a cylinder, Since the camera wont be looking up to high. In fact, sometimes the camera aims from above to the roof. But if the animation is more directed to the game, the camera may be  aiming to every direction, for that,I suggest using sphere background.

Tip: Use the wide texture (panorama), in order to get wider eye view. Also, choose one that  hue and saturation can be set into the atmosphere of night and day.


Good Luck!

Sunday, June 19, 2011

Sketchup-Exterior Vray Animation

Vray Exterior setting is actually easier than ray Interior setting (at least for day scene), because we can simply use the default light from sketchup, adjust it in Vray parameter setting, and voila! You have yourself a Vray rendering.

Here's a few tips you can use when creating a Vray exterior rendering :
  1. When using wood, metals or any material that using reflection, if used only as accent and the quantity isn't dominant, you don't need to give it any reflection
  2. Bump value for exterior scene should be bigger than you usually use in interior scene, because sunlight can sometimes washout your texture.
  3. Check the back of your glass object (the inside part) because sometime you just map the material from the outside and the material will be see-through, but when you render it, it will create shadow (which of course we won't want from a glass material)
  4. If you using only one light direction and value for the entire scene, you can save you Irradiance Map Value and Light Cache Value to a specific file and then change the mode from Single Frame mode to From file mode. This way you can save a lot of rendering time.
  5. For exterior scene, you can add texture for your reflective material, such as glass or metal that is dominant in your scene. It will make it more realistic. But the texture should be in the same theme with your background


Have a nice day!

Monday, May 30, 2011

Sketchup-Using Google Earth

Sometimes after completing a building, our clients still can't imagine how the buildings will be placed in its actual environment, Google SketchUp provides the google toolbar, which basically use google earth to position the building using contoured map.

We can import the the contoured map into our design and then after placing our building or object, we can export it again to google. And then we can save the image from its actual location from many views. Although it is not precise contours or landscape, but at least it will provide clearer image to our client, not to mention more practical, about how our building will be positioned.

Furthermore, we can also edit the contours of which we get by using the sandbox tools,such as add detail, Stamp and smoove.


Have a nice day!

Saturday, May 14, 2011

Max-Creating Vray material using Slate Material editor

After learning how to create material scene in tutorial 08, now it’s time for us to learn how to create Vray material. The material that we’re going to disscuss consist of standard Vray Material, floor material (porcelaine or marble), wood, glass and metal (gold). These material will be used quite often both for interior or exterior 3dsmax scene.

However, to achieve realistic results, we have to adjust the material that we’re going to make with our scene. Because there are many factors that affect the result, for example : the colour that we choose, the brightness of the room, how many lights we’re going to use, etc. So using the same parameter can generate different result in different scenes.  But still, the parameter given in this tutorial, can be a good start. You have to be creative in developing those parameters.

I’m also going to introduce the use of Slate Material Editor, which is available in 3ds Max 2010 and above. If you are using 3ds max 2009 or below that, it’s not really a problem, because the principle still the same.


Have a nice day!!

Monday, May 9, 2011

Sketchup-Creating Blanket and Pillow

Creating flexible or organic object using Sketchup is a bit difficult, unless we use certain additional plug-ins. But some creative tricks, we can create those kinds of models.
For example, the tricks in this tutorial, we're going to create blanket and pillow (which in its development could be use to create a table cloth), actually only a combination between using sandbox tools and soften tool in sketchup.

In some cases,  when we make basic polygon with a lot of sharp corner, it's possible to lose some polygon faces. But it can be overcome with enough practice.


Have a nice day!

Wednesday, May 4, 2011

Max-Creating Vray Scene Using Standard Camera

Using Vray doesn't mean that you have to use all of Vray tools. Standard 3ds Max Camera and Lights can also integrated well into a Vray Scene. The setting is so much easier (especially for the camera), and with proper settings, the result can be as good as using Vray camera and Lights. Of course we still have to use some rectangle Vray Light as the primary light sources. But then we can support it using Photometric light and target Direct light.

The advantage of using Photometric light is, when creating shaped light such as down light or wall light, we can see the shape of the light on the photometric light, so we can estimate the direction or the shape result when we render the scene. Also if we have a lot of lights you can see the difference between one light and the other.

One tip, try adding a disable Vray sun to the scene in this tutorial, with the same direction as the direct light. The scene will be more realistic


Have a nice day!

Thursday, April 28, 2011

Sketchup-Creating Vray Material

Vray materials in this tutorial are actually simplification from various possible way of making Vray Material for sketchup. This tutorial comprises:

1. Vray material standard, which actually automatically formed from Sketchup standard material
2. Material with Bump, for textured material
3. Glossy material, to make porcelain, marble, granite and such
4. Metallic material. I make gold material in this example, but with color adjusting you can also make iron, brass, chrome, copper etc
5. Glass material, which in its development can be plastic or water material

Keep in mind, that when creating a Vray texture in sketchup, make sure from the beginning which material you want to use and the size of the mapping you’re going to place. Because sometimes, after editing the standard material in Vray Material Editor, I find it difficult to change the texture. Sometimes I even have to start from importing the texture again.


Below, I only provide the fire texture for the fireplace. Other materials I used is pretty common, you can find them easily in your own library.


Have a nice day!

Tuesday, April 26, 2011

Sketchup-Vray Scene Setting

Vray is my most favorite rendering engine, even though I think it's a little bit slow on  the rendering process when I use it on Sketchup. In this tutorial I will show you how to set the fastest setting in  rendering parameter, but still give the optimum result.


But all of this parameters are not absolute. There are a lot of factor that affect your rendering result. For example, how big your window opening, what kind/color of material you are going to use, how many lights you place inside of your room, etc. All of those things will affect the result and your rendering speed. You have to be open for trial and error. A bit troublesome, I know. But the result will be worth all the trouble.


At the end of the tutorial, the rendering result may seem a little bit over bright. It's because we haven't place the material yet (we're going to discuss this on the next tutorial). So if you want, you can use the sketchup default material. It's compatible enough (with the exception with the opacity material) for Vray.


Family room


Have a nice day!!

Thursday, April 21, 2011

Max-Mapping Uneven Sides using Unwrap UVW

How do we map all kinds of texture into one object? On the previous tutorials, we’ve learned that we can do it by channeling it to a certain polygon in editable poly. And then we used UVW Map to adjust the texture size. But this way, all the texture size must be equal, and it has to follow the UVW Map direction. That’s why I detach some part of the polygon so we can have different texture. Besides, it also means we need multi obj map, which each map needs to be edited individually.

Other way, which, I think, more practical is by using Unwrap UVW. All the texture needed can be gathered in one map, and than using Unwrap, placed separately. With the adjustable size on each polygon.

This time I emphasize on making Architrave door and room Cornice. It can be used in more complex object. But that’s another story, another tutorial.


Have a nice day!!

Monday, March 28, 2011

Max-Creating A bedroom

There' a lot of 3dsMax models that you can use for your building or room (seats, windows, doors, trees, etc) whic you can find in stores or the internet, either for free or some you have to buy, like from archmodels. Using these models you can save a lot of time, because you don't have to model such supporting components for your presentation. You can even create your own library, which later you can upload or even sell on the internet.

For that you need to know how to properly import and exported 3dsMax files.  To import 3dsMax files to your scene, you're going to need to use Merge. But if you are importing different type of file, such as AutoCad or 3ds, you'll have to use Import. And you can't just copy 3dsMax file to another computer, since Max file connected to its texture, so for that, you'll need to Archive it.

We're going to learn all these using the plan that we've imported on our previous tutorial. But if you don't have any plan design you can use the picture below.

Bedroom Plan


Good luck!

Thursday, March 24, 2011

Max-Importing AutoCAD

For me, as an Architect, AutoCAD is an insaparable part when creating 3dsMax presentation. At first, sometimes I even model some parts of Autocad, and then edit them in Max. Of course, I can make the Max presentation from only a freehand drawing, but if I have a Autocad plan and section, I can work a lot more precise and faster.

For that, I created this tutorial so you will know what parameter to use when Importing CAD. But you have to remember, when importing AutoCad, the version of Cad should be the same or lower than 3dsMax. If it doesn't then save Cad as more older version first before you import it to 3dsMax.


Good Luck!

Sunday, March 20, 2011

Max-Classic Headbed using Spline

There's a lot of ways that you can use to convert a spline into a 3d objects. Spline

Loads of ways that can be used to convert Spline to be a model in 3ds max 3d. Spline includes all the base line, such as, Rectangle, circle, etc.. In this tutorial the modifier that were going to use to are:

  • Extrude
  • Loft, is to create an object turning certain path line using spline that shape in a certain ways, its really good to create a profile, corniche etc
  • Sweep, has the same function with loft, but easier to use. But Sweep is a bit limited to inelastic objects.
  • Lathe, you can also use lathe to create glass, bottle, and such

I'm also going to introduce you to the usement of alignment. It can make your 3dsMax object to be more precise. We're going to create using the head bed picture below.

Head bed that we're going to model

The result 


Good luck!

Wednesday, March 16, 2011

Max-Variation on Mapping

One of my favorite topic on 3dsMax is about Mapping. Mapping is how you put your texture to an object, and it can be done in so many ways. Using the right mapping, you can save a lot of time in modelling. For example, when you creating a carving on an object, you can model it of course but you can save a lot of time just by mapping it the right way. If you are talented both in modelling and mapping, it will be a very powerful combination!

Mapping combine with a good lighting will produce a very realistic object. Sometime, a simple design with a the right mapping and the right lighting will turn into a very impressive result.

But since there are so many methods of mapping, I have to start with the most basic ones. The ones that I use the most. If you are creative enough, you can combine them and develop it into the maximum result. The mapping that I'm going to discuss is using standard texture, but you can use it to other kind of texture to, such as Vray, Raytrace, and so on..

  1. UVW map : placing the texture in certain direction and size with bump and displacement
  2. Multi/Sub Object material, using this, you can map different texture in different parts of an object
  3. Blend material, mixing two textures into one material in a specific pattern
  4. Opacity on standard materials, so create a see through object using specific pattern.

The following materials will be used for mapping in my tutorial, you can copy from here if you like


Good luck!!

Saturday, March 12, 2011

Max-A Bookshelf from One Box

Max02-Wardrobe from Editable Poly

You can save a lot of time if you know how to modify an Editable poly, because it has a lot of parameters that you can use. At first, since I've been using 3dsmax since the days of the dinasaurs, I only use Editable Mesh, or even combining some standard primitives using boolean or group. Really messy, and such a waste of time comes to think about it.

Some people even say that Editable poly is the more advance version from editable mesh, and that editable mesh should be removed from 3dsMax. But I still prefer using Editable mesh some time, for example when I'm using boolean. So don't remove it. I like having options. :)

Before I found out how to use Editable poly and its tool set, it took me about 30-45 minutes to create a book shelf, but as you can see on the video later, using editable poly, it will take less than 10 minutes to do it. Isn't it great? But I'm only introducing you to the basic tools. Later, at the more advance level, you can create more complicated stuff. So, let's begin!


Bookshelf from a Box


Oh, Btw, I'm going to use this bookshelf in the mapping tutorial.


Good luck!

Thursday, March 10, 2011

Tips for faster 3dsMax Rendering

There are somethings that you can do so you can have smaller 3dsMax file, with less error and faster rendering time.
  1. Using Editable Poly instead of Editable mesh. Editable Poly in my opinion, is a development from Editable mesh, therefore it has more setting option, so it would be easier to model. Unless when I use boolean or pro boolean, then I'd rather use Editable mesh, because Editable poly's face/polygon usually ruin if I use those two.
  2. Use the Light that's suitable to the rendering engine. For example when you're using VRay rendering engine, then you better use Vray light, IEs, or Sun. Don't mix them with Omni, Direct Light, or any other default light from 3dsMax. It's doable, but you will have longer rendering time.
  3. Reduce Photon/Sample whe you setting your rendering engine. This apply to almost all rendering Engine. 
  4. Avoid using soft shadow, depends on the rendering engine that you are using. You can avoid this by reduce your light size, or disable the area shadow (if you're using Vray). But I must warn you that this methode will make the result less realistic.
  5. Reduce subdivision value, on anything that's has it. But not too much though, because it will create noise or spots on your rendering result.
  6. Reduce using bump and displacement when you map your texture
That's all, if you think there's more, I'll be glad to hear it.

Sunday, March 6, 2011

7 Steps for Sketchup's beginner


So you decide to use Google SketchUp (SU)? Here are seven tips that might help you when  you start using sketchup.

  1. Turn on all of the toolbar. Go to View> Toolbars, and then turn on all the available toolbars. Then save this toolbar settings (save toolbar only available in SU 8 or up). So when I start the tutorial, it'll be easier for you to find the right command.
  2. Group every time you created a new object. Because if not, it will merge to another object (unless if you meant for it to stick). For example after creating a rectangle, group it, the edit it.
  3. Learn Shortcuts. As in Autocad, 3dsMax, and everything else, it's easier if you know all the shortcuts in Sketchup. Go to Window> Preferences> Shortcuts. 
  4. Tape Measure. Use the command Tape measure (T) for drawing reference, I explain about this in my Sketchup Tutorial-Interface Introduction 2
  5. Put Layer, Entity Info, Materials and Component windows at the top right corner of the layer. Then leave it there, don't close it. If you're not using it, just minimized it. Because when the modelling become too complex ,this will save loading time.
  6.  Layers. If you are planning to make a room or a machine with high compexity, separate some parts using layers. So when you need them you can freeze them. You can't use hide, because you use hide, the object will remain editable. Those of you who are familiar with AutoCAD won't have a hard time understanding this concept.
  7. Lastly, before you start reading or watching the tutorial, first try ALL the commands in sketchup. Because, sketchup is so easy that  some commands can be directly learned without looking at the tutorial. This will speed up your learning time.


OK, and now ...Have a nice time learning!

Friday, March 4, 2011

Max-Things to know when you started learning 3dsMax

So you've decided to learn Max? Then, welcome to the dark side, rwahahaha... (sorry, I got carried away ^_^). But seriously, you might find it a bit confusing and for some people, it might get boring really soon. But once you pull through, when you can see how many things you can create from Max, like me, you can't stop. But then again, I'm a Max nerd :P.

But there are four basic things that you need to remember when you start learning Max:

Memorize the hotkeys! It's ok to use Icons at first, but gradually, you have to learned most of the hotkeys by heart. For example for T = Top View, P = Perspective and so on. There are tons of 3dsmax hotkeys there, All you need to do is google them.

Don't forget to save and save the file often. Save it in different names if you have to. Because, eventhough Max has Autoback, just save the file every 15-20 minutes. Because depends of your computer, the season, your rendering engine or just with no reason at all, 3ds Max gets cranky and then drop dead. And when that happens, whoaaarrgghhhhh ... There is no word to express the feeling. I really hope you will never find out.

Adjust your render setting with your computer speed and what you are going to do with the rendering result. For example, if you are going to print it in have a page of letter size paper. Don't waste time setting the rendering to such detail that turns out not so visible when you print it.

Practice and practice! A lot! Practice on anything that tutorials provide for you. There are tons of tutorials on the internet, from cushions, windows, lights, whatever, even when it's not really related to your line of work. There will be new things you will learn from each tutorial, and ultimately, it will be useful for you, when you least expected.

This is the video that will introduce you to 3ds Max Interface, this is really basic. But hopefully, this will be a good start so you can go on up to the very Advance level.


Have a nice time learning! ^_^

Wednesday, March 2, 2011

Sketchup or 3dsMax?

Just starting to learn 3d? Trying to decide which one youre going to choose, Google Sketchup (SU) or 3dsMax? Here are the things that you can take into consideration:

Google Sketchup:
  1. FREE! Just download it from google, then install it directly to your computer, and you're ready to go. And there's a lot of ready to use model, such as furniture, people, plants, cars, that you can download for free to your scene at google sketchup directory. All you need to do, search, download, and use, and...once again, it's free! 
  2. The parameters are quite simple, personally it only took me 2 days to be able to model using sketchup . 
  3. Sketchup is very quick and light for my computer to buld simple geometric shapes, such as minimalist style of furniture or building. But once you create complex polygon shapes, it turns very heavy. 
  4. Once completed, Sketchup can be exported directly in the form of working drawing such as, Plan or Section, and 3d, complete with its measurements.This is very useful to the Engineers, Architects, interior designers.
  5. You can export and link your sketchup to AutoCAD. So when you revise your 3d, your working drawing will be revised automatically, very simple! 

3dsMax: 
  1. Very nice for a complex and organic shapes. 3ds Max is even used for animated movies like Avatar, 2012, Iron Man (!), Etc. 
  2. Max can provide your needs for realistic result. 
  3. Max takes a long time to learn, because its parameters that you need to use, so if you get bored easily, may be Max is not a good idea for you. 
  4. 3dsMax is very expensive, so look out for discount! ^_^ 
  5. The computer requirement is a bit high. So basically, in my opinion, Sketchup is more for the practical use and 3dsMax is more about realistic result. Since I need them both, then I learned to use them both. But then again I'm a 3d nerd. :)

So in conclusion, Sketchup is more to the practical side and Max is for the realistic side. But hey, that's my opinion. I'd love to hear your thoughts on this ^_^.

Hey, maybe this pictures can help you!

This one made using Google Sketchup

This one made using 3dsMax
What do you think? For me, it's not helping at all, so I learned to use both. All I can say is, what ever you decide, have a nice time learning!